c#

  • Zip File Classes Finally Available in .Net 4.5

    Right now .Net 4.5 is still in beta, but I noticed something that will make developers who must interact with zip files happy: .Net 4.5 will have native support for dealing with zip files. Up until now, the System.IO.Compression namespace only had support for GZipStream and DeflateStream.

    I, like many other developers, have been using the fantastic SharpZipLib library, but I don’t like to have dependencies in my projects if I don’t have to. In order to iterate through a zip file and list its contents while extracting the code looks something like this (SharpZipLib has a lot of one-liners to allow for extracting with events as well, but bear with me):

    private static void ExtractSharp(string zipFile, string extractionLocationSharp)
    {
        Console.WriteLine("Extracting with SharpZipLib");
        Console.WriteLine();
    
        using (var archive = new ZipFile(zipFile))
        {
            int readCount;
            byte[] buffer = new byte[4096];
    
            foreach (ZipEntry entry in archive)
            {
                Console.WriteLine("Name: {0}, Size: {1}", entry.Name, entry.Size);
    
                var extractedPath = Path.Combine(extractionLocationSharp, entry.Name);
                if (entry.IsDirectory)
                {
                    Directory.CreateDirectory(extractedPath);
                }
                else if (entry.IsFile)
                {
                    using (var zipStream = archive.GetInputStream(entry))
                    {
                        using (var outputStream = new FileStream(extractedPath, FileMode.CreateNew))
                        {
                            while ((readCount = zipStream.Read(buffer, 0, buffer.Length)) > 0)
                            {
                                outputStream.Write(buffer, 0, readCount);
                            }
                        }
                    }
                }
            }
        }
    
        Console.WriteLine();
    }

    I haven’t installed the .Net 4.5 beta on my work machine yet, but according to the MSDN documentation, it should look like this:

    I don’t know if this compiles in .Net 4.5. I don’t have it installed yet.
    private static void ExtractDotNet(string zipFile, string extractionLocationDotNet)
    {
        Console.WriteLine("Extracting with .Net 4.5");
        Console.WriteLine();
    
        using (var archive = ZipFile.OpenRead(zipFile))
        {
            foreach (ZipArchiveEntry entry in archive.Entries)
            {
                Console.WriteLine("Name: {0}, Size: {1}", entry.FullName, entry.Length);
    
                var extractedPath = Path.Combine(extractionLocationDotNet, entry.FullName);
    
                // I'm not sure if it will create the directories or not.
                // There does not appear to be an IsDirectory or IsFile like in SharpZipLib
                entry.ExtractToFile(extractedPath);
            }
        }
    
        Console.WriteLine();
    }

    As you can see, it looks a bit cleaner, but the nice part is having it built into the framework instead of relying on yet another assembly.

    As noted in the comments, I’m not sure how .Net 4.5 will handle the directory entries or if it ignores them as separate entries. I may be able to test the beta later, but feel free to comment if you know how this works.


  • Windows Phone Emulator Time Skew When Computer Sleeps

    TLDR: If you put your computer to sleep, the Windows Phone emulator might have the wrong time when you resume. Restart the emulator to get it to have the current time in its clock.

    I was working on my fork of an OAuth library for Windows Phone this weekend, and I ran across a really weird issue. I’m posting this in case someone else Googles this problem, since I couldn’t find anything.

    I have a UNIX epoch timestamp generator (necessary for Twitter) class that looks like this:

        public class TimestampGenerator
        {
            public string Generate()
            {
                var unixEpoch = new DateTime(1970, 1, 1, 0, 0, 0);
                var now = DateTime.UtcNow;
    
                long stamp = ((now.Ticks - unixEpoch.Ticks) / 10000000);
    
                return stamp.ToString();
            }
        }

    I worked for hours on this on my desktop and everything was working fine. Then, when I did a git pull on my laptop, it was suddenly broken. When I’d make a request to the term.ie example OAuth service, it said my timestamp was expired every time. I set breakpoints and compared it to the current epoch timestamp, and it was definitely wrong. I tried many ways of calculating it (that division is to get to seconds from 100 microsecond increments (ticks); I haven’t benchmarked to see which is faster), but nothing made a difference.

    I calculated a time difference of about 102 hours from my current time based on the timestamps. I finally figured out that my emulator could have the wrong time, since I was thinking computer time == emulator time. I killed the emulator, hit F5, and it worked like a charm. Then, I thought about the time difference, and it was about the last time I put my laptop to sleep by closing its lid.

    Apparently, when the computer comes out of sleep, the computer clock stops matching the emulator clock; the emulator clock freezes when the computer sleeps and just resumes from where it left off. I’m not sure if this is a bug or not, or if it happens on a regular basis. I may try to reproduce it later, but probably not.


  • Pretty IPropertyNotifyChanged Declarations for Windows Phone

    The Problem

    I’ve been doing a bit of WPF/Windows Phone development. Usually INotifyPropertyChanged declarations for properties are really ugly. The big problem is that the INotifyPropertyChanged interface relies on strings, which don’t refactor well.

    I’m also using the fantastic MVVM Light Toolkit, which makes life a lot easier when doing Windows Phone development.

    MVVM Light has a snippet that you invoke with the shortcut mvvminpc that produces the following:

    /// <summary>
    /// The <see cref="ScreenName" /> property's name.
    /// </summary>
    public const string ScreenNamePropertyName = "ScreenName";
    
    private string _screenName = String.Empty;
    
    /// <summary>
    /// Sets and gets the ScreenName property.
    /// Changes to that property's value raise the PropertyChanged event. 
    /// </summary>
    public string ScreenName
    {
    	get
    	{
    		return _screenName;
    	}
    
    	set
    	{
    		if (_screenName == value)
    		{
    			return;
    		}
    
    		_screenName = value;
    		RaisePropertyChanged(ScreenNamePropertyName);
    	}
    }

    That saves quite a bit of work, but it’s still ugly. It still doesn’t refactor well because you have to change that property that corresponds to the string. MVVM Light also includes another snippet with the shortcut mvvminpclambda that gets closer to what I want, but it’s still a large declaration with the equality checking, but instead of using ScreenNamePropertyName (and you get to lose that property), that call looks like:

    RaisePropertyChanged(() => ScreenName);

    That’s getting there, but it’s still messy. I found a great solution for this problem from Christian Mosers, but it doesn’t compile in Windows Phone Silverlight due to the lambda compile, and it relies on PropertyChangedEventHandler. Also, Christian’s sets the value after the event handler is called. I’m not sure if that’s a mistake, but it seems like it is, and someone else already pointed that out in his comments.

    I’ve modified it a bit and now it works, gives me an inpcpretty shortcut, and cleans up my declarations a lot. I tried making it an extension method of the delegate I created, but that doesn’t work. In the end, I made it an extension of the value type T.

    The New Code

            private string _screenName = String.Empty;
            public string ScreenName
            {
                get { return _screenName; }
                set { value.ChangeAndNotify(RaisePropertyChanged, ref _screenName, () => ScreenName); }
            }

    The Extension Method

    namespace System
    {
        public static class INotifyPropertyChangedExtensions
        {
            public delegate void OnPropertyNotifyChangedDelegate(string input);
    
            public static bool ChangeAndNotify<T>(this T value, OnPropertyNotifyChangedDelegate handler,
                ref T field, Expression<Func<T>> memberExpression)
            {
                if (memberExpression == null)
                {
                    throw new ArgumentNullException("memberExpression");
                }
                var body = memberExpression.Body as MemberExpression;
                if (body == null)
                {
                    throw new ArgumentException("Lambda must return a property.");
                }
                if (EqualityComparer<T>.Default.Equals(field, value))
                {
                    return false;
                }
    
                var vmExpression = body.Expression as ConstantExpression;
                if (vmExpression != null)
                {
                    field = value;
    
                    if (handler != null)
                    {
                        handler(body.Member.Name);
                    }
                }
                return true;
            }
        }
    }

    The Snippet

    <?xml version="1.0" encoding="utf-8"?>
    <CodeSnippets xmlns="http://schemas.microsoft.com/VisualStudio/2005/CodeSnippet">
      <CodeSnippet Format="1.0.0">
        <Header>
          <SnippetTypes>
            <SnippetType>Expansion</SnippetType>
          </SnippetTypes>
          <Title>INPC Property</Title>
          <Author>Chris Benard</Author>
          <Description>A property raising PropertyChanged with a string. The class using this property should inherit GalaSoft.MvvmLight.ObservableObject.</Description>
          <HelpUrl>http://www.galasoft.ch/mvvm</HelpUrl>
          <Shortcut>inpcpretty</Shortcut>
        </Header>
        <Snippet>
          <Declarations>
            <Literal Editable="true">
              <ID>Type</ID>
              <ToolTip>Property type</ToolTip>
              <Default>bool</Default>
              <Function>
              </Function>
            </Literal>
            <Literal Editable="true">
              <ID>AttributeName</ID>
              <ToolTip>Attribute name</ToolTip>
              <Default>_myProperty</Default>
              <Function>
              </Function>
            </Literal>
            <Literal Editable="true">
              <ID>InitialValue</ID>
              <ToolTip>Initial value</ToolTip>
              <Default>false</Default>
              <Function>
              </Function>
            </Literal>
            <Literal Editable="true">
              <ID>PropertyName</ID>
              <ToolTip>Property name</ToolTip>
              <Default>MyProperty</Default>
              <Function>
              </Function>
            </Literal>
          </Declarations>
          <Code Language="csharp">
            <![CDATA[private $Type$ $AttributeName$ = $InitialValue$;
            public $Type$ $PropertyName$
            {
                get { return $AttributeName$; }
                set { value.ChangeAndNotify(RaisePropertyChanged, ref $AttributeName$, () => $PropertyName$); }
            }]]>
          </Code>
        </Snippet>
      </CodeSnippet>
    </CodeSnippets>

    Conclusion

    There is probably a better way to do this, but I’m not that experienced in WPF/Silverlight/Windows Phone yet. If you know of a better way, please let me know.

    To use this snippet, click the raw button in the code listing (looks like <>), save the contents as inpcpretty.snippet. Then, in Visual Studio, go to Tools -> Code Snippets Manager. Switch the language to C# and select Import. Choose the .snippet file you saved and you should be in business!


  • Hosting Windows Workflow Foundation in a Console Application without Ugly Code

    I’ve been using Windows Workflow Foundation for a small personal project to learn more about it and see what it can do. It’s pretty powerful and I’m looking forward to delving more into it. For my purposes though, I’m hosting the workflow in a console program.

    If you look around the internet, you’ll see lots of examples of hosting a sequential workflow in a synchronous manner, even though the WorkflowRuntime only support asynchronous operations. That code usually looks like this (example adapted from wf-training-guide.com to add support for input/output arguments):

    static void Main(string[] args)
    {
      Dictionary<string, object> inputArguments = new Dictionary<string, object>();
      inputArguments.Add("Argument1", args[0]);
      Dictionary<string, object> outputArguments;
        
      // Create the WF runtime.
      using(WorkflowRuntime workflowRuntime = new WorkflowRuntime())
      {
        // Hook into WorkflowCompleted / WorkflowTerminated events.
        AutoResetEvent waitHandle = new AutoResetEvent(false);
        workflowRuntime.WorkflowCompleted
          += delegate(object sender, WorkflowCompletedEventArgs e)
            {
              outputArguments = e.OutputParameters;
              waitHandle.Set();
            };
    
        workflowRuntime.WorkflowTerminated
          += delegate(object sender, WorkflowTerminatedEventArgs e)
            {
              Console.WriteLine(e.Exception.Message);
              waitHandle.Set();
            };
    
        // Create an instance of the WF to execute and call Start().
        WorkflowInstance instance =
          workflowRuntime.CreateWorkflow(typeof(WorkflowClass));
        instance.Start();
    
        waitHandle.WaitOne();
      }
    }

    Unfortunately, that’s a ton of code to do only a few things:

    1. Take input arguments
    2. Instantiate a WorkflowRuntime
    3. Create a workflow instance
    4. Run the workflow
    5. Handle any exceptions (poorly)
    6. Return output parameters from the workflow
    7. Do all of this in a synchronous manner.

    What if we could just call a method similar to this:

    var outputArguments = RunWorkflow<WorkflowClass>(arguments, completedEvent, terminatedEvent);

    Well, now you can! I’ve written this wrapper class to allow exactly that:

    public class WorkflowManager
    {
      public static Dictionary<string, object> RunWorkflow<T>(
        Dictionary<string, object> arguments,
        EventHandler<WorkflowCompletedEventArgs> completedEvent,
        EventHandler<WorkflowTerminatedEventArgs> terminatedEvent)
        where T : SequentialWorkflowActivity
      {
        using (WorkflowRuntime runtime = new WorkflowRuntime())
        {
          Dictionary<string, object> returnValue = null;
          Exception ex = null;
    
          using (AutoResetEvent waitHandle = new AutoResetEvent(false))
          {
            WorkflowInstance instance = runtime.CreateWorkflow(typeof(T), arguments);
            runtime.WorkflowCompleted += (o, e) =>
            {
              EventHandler<WorkflowCompletedEventArgs> temp = completedEvent;
              if (temp != null)
              {
                temp(o, e);
              }
    
              returnValue = e.OutputParameters;
    
              waitHandle.Set();
            };
    
            runtime.WorkflowTerminated += (o, e) =>
            {
              EventHandler<WorkflowTerminatedEventArgs> temp = terminatedEvent;
              if (temp != null)
              {
                temp(o, e);
              }
    
              ex = e.Exception;
    
              waitHandle.Set();
            };
    
            instance.Start();
            waitHandle.WaitOne();
          }
    
          if (runtime != null)
          {
            runtime.StopRuntime();
          }
    
          if (ex != null)
          {
            throw ex;
          }
    
          return returnValue;
        }
      }
    }

    Now you really can run the above code to execute your workflow in a synchronous manner without all kinds of messy code. Beware creating multiple WorkflowRuntime instances though. If you are managing multiple simultaneous workflows, you’ll need to pass in instance IDs and keep track in the runtime of which one is completing or throwing errors. It’s generally a bad idea to have multiple WorkflowRuntimes.

    Enjoy now being able to write:

    var outputArguments = RunWorkflow<WorkflowClass>(arguments, completedEvent, terminatedEvent);

  • Beyonc□, or How We Can All Learn From Other Developers’ Character Encoding Mistakes

    Picture of Unicode Error, displaying Beyoncé as Beyonc-block

    I’m sure everyone who reads this blog has noticed, at some point, the result of another developer’s mistake in dealing with Unicode or other character encodings. I’ve had a few issues myself. To the left, you can see how my Napster displayed a Beyoncé song as Beyonc□. You may have seen a black diamond symbol with a question mark in it while browsing a web page, or perhaps other strange symbols when interacting with programs or web pages.

    Most, if not all of these, are inconsistencies when dealing with character encoding, with most of them being Unicode. Hazarding a guess, Beyoncé’s is likely stored as Unicode (UTF-16) in Napster’s database, but when output on the screen, it is converted down to UTF-8 or ASCII. Either way, it can’t be converted down, so an entity is displayed. There is even a shirt memorializing the problem in T-shirt form:

    I {entity} Unicode T-shirt

    My issues have been even more low-level than this. I deal with a lot of interaction using EDI with older computer systems running UNIX or or some IBM mainframe OS. None of these are using Unicode for their medical claims adjudication, and are either using ASCII or EBCDIC. Yes, EBCDIC; I have to program using EBCDIC in 2009.

    I have to be very careful when I’m converting to and from Unicode, the native format of the string class in .Net, and other character encodings such as ASCII and EBCDIC, and so should you.


  • Accessing a Control Without Being Able to See It on a Windows Form

    Menu Key Displayed on KeyboardA coworker of mine had a problem and came to me for help. She had a windows form with a control on it that she wanted to edit or delete, but couldn’t see the control. It was listed in the properties box in the list of controls on the form, but when she selected it, she wasn’t able to click it on the form, because it was behind another control.

    I hypothesized a solution, which worked, but requires the use of a less than frequent key on your keyboard, the menu key. Usually this key is two keys to the right of the space bar on windows keyboards, between Alt and Control. A picture of it is on the right.

    Note: As pointed out by Lee, in the comments, you can press Shift + F10 if your keyboard doesn’t contain the Menu Key.

    The Form With a Hidden Label Behind the Filename TextBox) Form with hidden label control

    Properties Window Listing the Hidden Control, HiddenLabel

    Properties window list of controls

    Select the control that you can’t see. It will be highlighted on the form.

    Form with Hidden Control Highlighted

    Label highlighted after selecting from properties windowThe hidden control becomes highlighted. Click into the title bar of the form. Press the menu key on your keyboard to display the context menu.
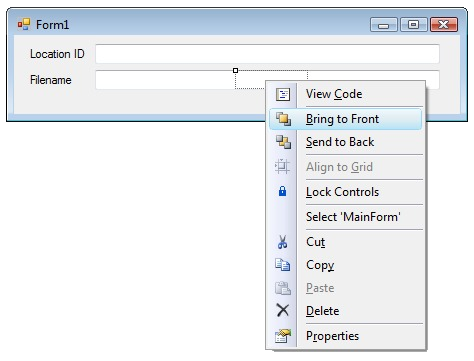
    Context Menu Being Displayed After Pressing the Menu Key

    bringtofrontSelect “Bring to Front” to display the control. It will now be visible and can be edited or removed.

    Hidden Control Moved

    Label after being brought to front and movedAs you can see, the control that was previously hidden is now visible and has been moved.

    I know this is a basic solution to an easy problem, but I had to figure it out, and I hope that someone searching may find this useful as well. The above example was a new form I was starting; it is not the actual application in question.


  • Using Reflection to Dynamically Generate ToString() Output

    Update: Added code to show “null” when a property is null, like Visual Studio does.

    If you’ve ever used Visual Studio in any iteration in any language, you have most likely used the immediate window. It’s insanely useful and lets you just type an instance of an object and if the object doesn’t have an overridden ToString() method (I’m back in C#/.Net world here for the purposes of this post), Visual Studio will dynamically generate output for you, so that you can see the current state of the object.

    Here is what Visual Studio’s output looks like on an object I have:

    {CompanyName.CreditCard.Processor.CreditDebit.SaleResponse}
        base {CompanyName.CreditCard.Processor.Response}: {CompanyName.CreditCard.Processor.CreditDebit.SaleResponse}
        AddressVerificationSuccess: true
        AuthorizationCode: null
        AuthorizedAmount: 50
        CvvSuccess: false
        ReferenceNumber: null

    However, what if you want to be able to have ToString() generate this type of output for you, for the purposes of debugging, like using with Debug.WriteLine or Trace or any other logging framework? It is useful to be able to see later what the state of an object was during a problem situation. Sure, you can write your own ToString() code in every object to generate its state in string form, and then aggregate all the base objects using base.ToString(), but that is a lot of iterative, repetitious coding.

    My classes are simple data transfer objects and look like this:

    public class SaleResponse : Response
    {
        public virtual bool AddressVerificationSuccess { get; set; }
        public virtual bool CvvSuccess { get; set; }
        public virtual string AuthorizationCode { get; set; }
        public virtual string ReferenceNumber { get; set; }
        public virtual decimal? AuthorizedAmount { get; set; }
    }
    
    public class Response
    {
        public virtual bool Success { get; set; }
        public virtual string ResponseMessage { get; set; }
        public virtual string TransactionID { get; set; }
        public virtual string GatewayResponseCodeText { get; set; }
        public virtual string IssuerResponseCodeText { get; set; }
        public virtual GatewayResponseCode GatewayResponseCode { get; set; }
        public virtual IssuerResponseCode IssuerResponseCode { get; set; }
    }

    As you can see, Visual Studio didn’t even give me the contents of the base class, but I want this information. My ToString() method I’ve created in the SaleResponse object is the following:

    public override string ToString()
    {
        var flags = System.Reflection.BindingFlags.Instance | System.Reflection.BindingFlags.Public | System.Reflection.BindingFlags.FlattenHierarchy;
        System.Reflection.PropertyInfo[] infos = this.GetType().GetProperties(flags);
    
        StringBuilder sb = new StringBuilder();
    
        string typeName = this.GetType().Name;
        sb.AppendLine(typeName);
        sb.AppendLine(string.Empty.PadRight(typeName.Length + 5, '='));
    
        foreach (var info in infos)
        {
            object value = info.GetValue(this, null);
            sb.AppendFormat("{0}: {1}{2}", info.Name, value != null ? value : "null", Environment.NewLine);
        }
    
        return sb.ToString();
    }

    Which generates the following output:

    SaleResponse
    =================
    AddressVerificationSuccess: True
    CvvSuccess: False
    AuthorizationCode: null
    ReferenceNumber: null
    AuthorizedAmount: 50
    Success: True
    ResponseMessage: null
    TransactionID: AXB234234
    GatewayResponseCodeText: null
    IssuerResponseCodeText: null
    GatewayResponseCode: ExpiredDevice
    IssuerResponseCode: Error

    What I like about this approach is that it grabs all the base object’s properties recursively. Obviously, there are performance concerns with doing reflection, so I wouldn’t use this constantly, but I think it’s a good way to write out the state of an object in the event of an error. Also, I made the example simple for this blog post, but obviously, you could put that code into an extension method for System.Object or just into a static utility class, adding an object parameter and replacing “this” with the name of the object parameter.


  • Strong Name an Assembly Without Source Code

    Because I program in the 1970’s, part of what I do is programming against modems and serial ports. Specifically, we send medical claims over modem to adjudicators, in the event of unavailable internet access. As a customer, you’ll appreciate having your pharmacy delay you for 20 seconds rather than saying “Sorry; you can’t have your medicine.”

    While taking a break from disco dancing, I was trying to add a strong name to one of our projects. One of the requirements, however, for strong naming is that all of the assemblies you reference must be strong named as well. All are, except one: COMM-DRV/Lib.Net. We use this assembly to talk to the modems, because it abstracts a lot of the serial communications and allows us to program against a logical “modem”.

    I called the vendor, Willies Computer Software Company, and he said that we’d have to have the source license to strong name, but I asked why they don’t strong name their own binary distribution. He just kept saying they don’t do that, and we’d have to buy the source license. We didn’t need to make changes to their code, though; in fact, I already did that by inheriting their class and hiding some methods with new ones.

    So, I set about trying to find out how to strong name an assembly for which you do not have the source. The short answer is “you can’t.” The longer answer is “You can’t, unless you disassemble it, reassemble it, while signing at the same time, and only if it’s not obfuscated.” I finally found the answer I was looking for at geekzilla.

    Here are the steps you need (back up your old assembly):

    Create a Key Pair

    This is only necessary, of course, if you don’t already have one generated for yourself or your company.

    sn.exe -k C:\Path\To\KeyPair.snk

    Disassemble the Assembly into IL

    ildasm.exe CdrvLibNet.dll /out:CdrvLibNet.il

    Reassemble the Assembly from IL While Signing

    ilasm.exe CdrvLibNet.il /dll /output=CdrvLibNet-StrongNamed.dll /key=C:\Path\To\KeyPair.snk

    The Result

    Thankfully, everything worked great, because their assembly was not obfuscated (it’s basically a .Net wrapper around their C++ unmanaged, native DLL product, so no real intellectual property to steal here). Now, we have their product strong named with our public key, and we are able to build on top of it with a strong named product of our own.


  • How Insensitive

    Update: Added section at the bottom detailing what not to do.

    As part of the updater process that I wrote for a current project, a “boot strapper” program queries the database for available versions, and if there is a newer version available, it deletes the current program folder, replaces those files with the new files, and then executes the main program executable. If there are no newer versions, it simply executes the main program executable immediately. This gives the user they are executing the program itself, instead of the “invisible” boot strapper, but we are able to easily manage updates in this manner.

    Obviously, if you are a .Net developer, you know about the venerable app.config, which is used to set program parameters at run-time, rather than at design time. Because these can contain changes to our connection strings and custom configuration sections, we wanted to preserve this and other special files that may be used in the future. As our solution, we created a whitelist of files that we do want to replace, that looked like this:

            ///
            /// Extensions of files that may be deleted during uninstall/reinstall.
            ///
            private List _deletableExtensions = new List(
                new string[] { ".exe", ".dll", ".pdb", ".chm", ".manifest" });
    
            private bool canDeleteOrOverwrite(FileInfo file)
            {
                // Only delete files with specific extensions.
                bool canDelete = _deletableExtensions.Contains(file.Extension);
    
                return canDelete;
            }

    Before anybody murders me, we camel case private methods and underscore prefix and camel case private class-level variables here. As you can see, this will allow deletion of executables, class libraries, debug symbols, help files, and manifests. However, we had a problem in my code that didn’t surface until yesterday. We were trying to figure out why one file out of all the files in the directory was remaining an older version, “ActiveReports3.DLL”.

    What may be obvious to the reader, especially considering the title of this post, is that my List<T>.Contains() check, by default, is case sensitive, and “.DLL” != “.dll”. This required quite a bit of stepping through code to find, as I wrote this code a long time ago. A simple press of “Ctrl+Shift+Space” revealed that there was an overload of IEnumerable<T>.Contains(T item, IEqualityComparer<T> comparer).

    Because I’ve had to do this in the past, I knew that, because my T in this case was string, all I needed to do was use the StringComparer, which implements the IEqualityComparer<string> interface. Because it is filenames, and we are working with Visual Studio generated files, we care neither about culture nor case in this instance. Here is the revised, working version:

            ///
            /// Extensions of files that may be deleted during uninstall/reinstall.
            ///
            private List _deletableExtensions = new List(
                new string[] { ".exe", ".dll", ".pdb", ".chm", ".manifest" });
    
            private bool canDeleteOrOverwrite(FileInfo file)
            {
                // Only delete files with specific extensions.
                bool canDelete = _deletableExtensions.Contains(
                    file.Extension,
                    StringComparer.InvariantCultureIgnoreCase);
    
                return canDelete;
            }

    That’s it! That tiny change fixed our issue and allowed the boot strapper to overwrite that file. It’s amazing that a simple little omission like that can lead to such a strange problem manifesting itself. Everybody makes mistakes; I just thought I’d showcase one of my errors and how I fixed it.

    After talking to one of my coworkers about this post, he mentioned something that we have both seen done to “work around” this particular problem, which should not be done. This is what I have seen before in others’ code:

            ///
            /// Extensions of files that may be deleted during uninstall/reinstall.
            ///
            private List _deletableExtensions = new List(
                new string[] { ".exe", ".dll", ".pdb", ".chm", ".manifest" });
    
            private bool canDeleteOrOverwrite(FileInfo file)
            {
                bool canDelete = false;
    
                // Only delete files with specific extensions.
                foreach (string currentExtension in _deletableExtensions)
                {
                    if (currentExtesion.ToLower() == file.Extension.ToLower())
                    {
                        canDelete = true;
                        break;
                    }
                }
    
                return canDelete;
            }

    This creates a LOT of strings on the heap in the process is and is very inefficient. It’s much better to let .Net handle itself and just let it know whether you care about culture and/or case sensitivity.


  • A Day Late and a Property Declaration Short

    I know this is a bit late to the game, but this morning, as I’m refactoring a bunch of old code to be shared with a new project, I’m cleaning up the C# 2.0 property declarations we all know and love:

        public class SaleResponse : Response
        {
            protected bool _addressVerificationSuccess;
            public virtual bool AddressVerificationSuccess
            {
                [DebuggerStepThrough]
                get { return _addressVerificationSuccess; }
                [DebuggerStepThrough]
                set { _addressVerificationSuccess = value; }
            }
    
            protected bool _cvvVerificationSuccess;
            public virtual bool CvvSuccess
            {
                [DebuggerStepThrough]
                get { return _cvvVerificationSuccess; }
                [DebuggerStepThrough]
                set { _cvvVerificationSuccess = value; }
            }
    
            protected string _authorizationCode = string.Empty;
            public virtual string AuthorizationCode
            {
                [DebuggerStepThrough]
                get { return _authorizationCode; }
                [DebuggerStepThrough]
                set { _authorizationCode = value; }
            }
    
            protected string _referenceNumber = string.Empty;
            public virtual string ReferenceNumber
            {
                [DebuggerStepThrough]
                get { return _referenceNumber; }
                [DebuggerStepThrough]
                set { _referenceNumber = value; }
            }
    
            protected decimal? _authorizedAmount;
            public virtual decimal? AuthorizedAmount
            {
                [DebuggerStepThrough]
                get { return this._authorizedAmount; }
                [DebuggerStepThrough]
                set { this._authorizedAmount = value; }
            }
        }

    This code is, of course because I wrote it, wonderful and has no flaws, and I used the prop snippet to create the private variable and public property getter and setter. However, I have all those DebuggerStepThrough attributes in there, due to the lovely fun of stepping through code that references properties. That avoids stepping in and out of the property declarations.

    Thank the flying spaghetti monster that now, in C# 3.0 (and of course 3.5, 4.0 and on), Microsoft has given us auto-implemented properties. This is now the equivalent code, avoiding the stepping in/out of the get/set and not requiring the declaration of a private variable:

        public class SaleResponse : Response
        {
            public virtual bool AddressVerificationSuccess { get; set; }
            public virtual bool CvvSuccess { get; set; }
            public virtual string AuthorizationCode { get; set; }
            public virtual string ReferenceNumber { get; set; }
            public virtual decimal? AuthorizedAmount { get; set; }
        }

    When I first learned this trick, I was extremely thankful to be able to do this as an even shorter shortcut to using the prop snippet and it makes the code a lot prettier. What I didn’t immediately realize is how to control scoping. Let’s say, for instance, I want that AuthorizationCode property to only be able to be set from inside the class itself, and I only want the AuthorizedAmount property to be able to get set from inside the class and inherited classes. I can then change those declarations like this:

        public class SaleResponse : Response
        {
            public virtual bool AddressVerificationSuccess { get; set; }
            public virtual bool CvvSuccess { get; set; }
            // This can now only be set from inside the class
            public virtual string AuthorizationCode { get; private set; }
            public virtual string ReferenceNumber { get; set; }
            // This can now only be set from inside the class and those that inherit from it
            public virtual decimal? AuthorizedAmount { get; protected set; }
        }

    This allows you to control the scoping of the getter and setter independently. By default, they inherit the visibility of the property declaration, in this case, public for all. I’m always thankful for the tools Microsoft gives me to make my life easier and to give me more time to spend on the actual work, rather than installing plumbing.


Posts navigation